November 2023

What is An URBAN FARMHOUSE: Expert – EVERYTHING You Need to Know

“But perhaps what truly sets urban farmhouses apart is their ability to seamlessly integrate indoor-outdoor living spaces…”

Welcome! I'm Einav

Greetings! I'm delighted that you discovered my little piece of online paradise. Join me as we relish in the comforts of our home centered lifestyle. I'm enthusiastic about living naturally, from scratch cooking, and establishing a home that's a true reflection of who we are, as Individuals and as a family. Let's celebrate the everyday beauty of life as we share our experiences together!

What is Urban Farmhouse?


Time to explore the intriguing concept of an “urban farmhouse.” Now, when you think of a farmhouse, your mind probably drifts off to open fields, cows mooing in the distance, and maybe even some overalls. But hold on tight because we’re about to give this rural dream a hilarious urban twist!


Picture this: You’re strolling through a bustling metropolis with skyscrapers towering above you. Suddenly, amidst the concrete jungle, you stumble upon an unexpected sight – an urban farmhouse! Yes, that’s right folks, it’s like someone plucked a farm from the countryside and dropped it smack dab in the middle of all that chaos.


So what exactly is an urban farmhouse? Well, it combines the rustic charm of traditional farmhouses with all the conveniences and excitement of city life. It’s like having your cake and eating it too (while surrounded by chickens clucking away)! Instead of acres upon acres of land for crops and livestock roaming free-range style, these urban farms make do with limited space. Picture tiny vegetable gardens squeezed onto rooftops or balconies adorned with colorful planters full of aromatic herbs. Forget cornfields; we’ve got microgreens growing under grow lights! Now let’s talk about animals. No more vast barns filled with cute little piggies or moo-tiful cows (pun intended). Urban farms opt for smaller-scale livestock like chickens – perfect for those fresh eggs every morning! Imagine waking up to their gentle clucking instead of noisy traffic outside your window. Who needs alarm clocks when you have feathered friends.

old urban farmhouse downstream

What is Urban farmhouse style?

Step into an urban farmhouse and you’ll immediately feel a sense of tranquility wash over you. The soothing color palettes, often featuring soft neutrals like cream, beige, and gray, create a serene atmosphere that encourages relaxation. Combined with natural textures such as distressed wood floors or exposed brick walls, every corner exudes a timeless beauty.

The heart of any urban farmhouse is undoubtedly the kitchen – a gathering place for family and friends alike. Imagine preparing delicious meals on a spacious butcher block island while enjoying the company of loved ones seated around a large farm table nearby. Open shelves adorned with vintage mason jars filled with colorful spices add a touch of whimsy to this culinary sanctuary.

In an urban farmhouse bedroom, comfort reigns supreme. Soft linens in muted tones invite you to sink into plush pillows after a long day’s work. A weathered barn door serves as both functional room divider and striking focal point – effortlessly blending form and function in one stunning piece.

When it comes to decor in an urban farmhouse, less is more. Thoughtfully curated vintage finds are artfully juxtaposed against sleek modern pieces for an eclectic yet cohesive look. An antique armoire housing your television stands next to sleek leather couches; delicate lace curtains frame tall windows overlooking cityscapes.

But perhaps what truly sets urban farmhouses apart is their ability to seamlessly integrate indoor-outdoor living spaces. Step outside onto your charming patio or balcony adorned with potted plants and twinkling string lights overhead – perfect for savoring morning coffee or hosting intimate gatherings under the stars.

Living in an urban farmhouse means embracing a slower pace of life, a lifestyle that celebrates simplicity and authenticity. It’s about finding beauty in imperfections, cherishing the stories behind each vintage piece, and creating spaces that evoke a sense of nostalgia.

So whether you’re drawn to the timeless elegance of weathered wood or the inviting warmth of exposed brick walls, I invite you to create your own sanctuary in the midst of bustling city life.

read more about urban homesteading here

How do I start my own urban farmhouse?

living the urban farmhouse life is a long and beautiful journey I hope we take together. Creating your own homestead is a beautiful start to this journey. check out this blog post on what is an urban homestead. I LOVE BREAD, and I think a farmhouse isn’t complete without the aroma of fresh bread in the oven.  Check out this BEST easy Challah recipe you will love. Sourdough enthusiast? Check out this high protein sourdough discard muffins and don’t forget to stay tuned for more urban farmhouse renovations we are planning this year

Join Our FARMHOUSE DOWNSTREAM Community

From scratch recipes, self-sufficient living, and handmade projects straight to your inbox

By completing this form you're signing up to receive our emails and can unsubscribe at any time

What is An URBAN FARMHOUSE: Expert – EVERYTHING You Need to Know Read More »

Spice Up Your Meals with This Simple Matbucha

Bursting with flavor and packed with wholesome ingredients, this matbucha recipe is here to add a burst of color and excitement to your meals. So grab your apron, chop up those veggies, and let’s get cooking!

Hey there, spice lovers and food enthusiasts! Are you ready to embark on a culinary adventure that will transport your taste buds straight to the vibrant streets of Morocco? Look no further, because today we’re diving into the world of matbucha – a delicious and tangy tomato-based dish that is as easy to make as it is irresistible.

Welcome! I'm Einav

Greetings! I'm delighted that you discovered my little piece of online paradise. Join me as we relish in the comforts of our home centered lifestyle, living naturally, from-scratch cooking, and establishing a home that's a true reflection of who we are. Let's celebrate the everyday beauty of life together!

Why you will love this recipe:

Authentic food – If you’re a fan of exploring new cultures and trying delicious food, then I think you’ll really enjoy this recipe. It’s super simple and has a wonderful cultural twist that’s sure to impress your taste buds.


Simple & Adjustable – it’s really easy to adjust to your schedule – whether you have two hours or six, this recipe can fit in. I’m happy to share my tips and tricks with you too!


Healthy Alternative– this recipe is a fantastic and healthier alternative to ketchup, and you can use it in so many different ways as a base for other recipes or even on its own. Give it a go and let me know what you think!

Have you heard of Matbucha?


Matbucha is a wonderful sauce and side that originates from Morocco but is now widely used in Israeli cuisine. It’s a versatile dish loved by many foodies around the world!


Made with tomatoes, oil, and spicy peppers, matbucha has a great balance between the sourness of the tomatoes, the sweetness of the garlic and the spiciness of the green pepper. What’s more, it also contains umami, the fifth flavor, which is simply divine!


Matbucha is slowly cooked for a long time, allowing the water to slowly evaporate. This concentration of flavors makes it an absolute delight to the palate. It’s best served with something neutral like couscous or challah to balance out all the goodness it has to offer. Don’t hesitate to try this fantastic sauce, you won’t be disappointed!

what is matbucha sauce made of?


Matbucha sauce is made out of mainly fresh tomatoes slowly cooked down to a thick consistency, oil and garlic and sometimes with roasted peppers.Matbucha sauce is a real treat for the taste buds that originates from the beautiful and unique flavors of Morocco.


The ingredients used to create this flavorful masterpiece are fresh tomatoes, (if desired you can add some roasted peppers), oil, and garlic, combined in perfect balance. To achieve the complex and delicious flavor profile that matbucha is famous for, the ingredients are slow-cooked for many hours to bring out their best qualities. Adding of garlic and chili pepper elevates this condiment to another level of deliciousness.


Traditionally, this dish is served on Shabbat as an appetizer alongside challah or “home bread” – a delightful Moroccan bread. It is also great as part of a salad, or as a base for shakshuka. You can get your hands on this scrumptious condiment from popular brands such as Sabra, Osem, and NY Shuk, which are readily available for purchase at your local grocery store. So why not tantalize your taste buds with the rich and savory taste of matbucha today? You won’t regret it!

Ingredients list:

  • Fresh Tomatoes
  • Garlic
  • Neutral Oil
  • Salt & Pepper
  • Sugar – or any sweetener of your choice

TOOLS YOU WILL NEED:

large pot 
wooden spoon
knife
cutting board
spoon
garlic press (optional)

gloves (optional)

Matbucha recipe with eggplant

Eggplant Matbucha recipe is a twist on the classic matbucha salad, which uses eggplant to make a more filling dish. You’ll need two eggplants, a tablespoon of coarse salt, and a quarter cup of oil.First, prepare the matbucha according to the recipe below.


While it cooks, wash the eggplants, cut them into cubes, and put them in a sieve in the sink. Rub the salt into the eggplant and let it sit for 30 minutes to drain excess water. After 30 minutes, heat your oven to 200C/400F and broil the eggplant with oil for about 30 minutes, stirring halfway through.


Finally, add the crispy eggplant to the matbucha and cook for another one to two hours, stirring occasionally until it’s thick and delicious.

Matbucha vs shakshuka


Matbucha, with its Moroccan roots, is a delightful tomato salad that is slow-cooked to perfection and used in Israeli cuisine. It’s incredibly wholesome and satisfying – a favorite among many foodies.


Shakshuka, on the other hand, is a traditional Tunisian dish with gently poached eggs in a hearty tomato and pepper sauce. The warm spices like cumin, paprika, and crushed red pepper flakes used in Shakshuka give it a burst of flavor that will leave you wanting more.


I know what you’re thinking – can you use matbucha as a base for your shakshuka at home? And the answer is a resounding YES! The chunky tomato sauce itself can be made with leftover matbucha, chopped onions, and bell peppers, diluted with a bit of water to make it thinner, making it the perfect pairing for your eggs.


If this sounds like a culinary adventure you’d like to embark on, I’d be more than happy to share a step-by-step recipe with you for this incredibly satisfying one-skillet meal. Let me know if you’re interested!

matbucha vs harissa


Are you a foodie and curious about exotic spreads? If the answer is yes, let me delve into the world of harissa and matbucha.


Harissa (Arisa, cradle, harissa, harissa, hemlock or sakhka), a traditionally North African spread, is an enticing combination of dried hot and sweet peppers, garlic, oil, and spices. Its unique taste and pungency can be attributed to the use of sweet or hot peppers. Depending upon the quantity of the peppers used, harissa can be sweet or spicy. The country-wise preparation method of harissa slightly varies. However, blending of the soaked dried peppers with garlic, cumin, salt, and oil is a common practice.


In comparison, matbucha (Matbuha, Marmoma, “cooked salad”) is a well-known Israeli salad, comprises of fresh tomatoes, roasted peppers, oil, and garlic. Though the ingredients are nearly the same, the way of preparation slightly changes across countries. You can find delicious matbucha in American markets under brands like NY Shuk. A must-try for all, who love experimenting with new culinary delights!

HOW TO MAKE THE BEST easy matbucha recipe

STEP 1


Begin by cutting your tomatoes into half-inch chunks. Then, carefully cut your peppers (using protective gloves as needed) and crush your garlic using a garlic press or chop it finely with a knife.

STEP 2

To begin cooking confidently, add oil and peppers to your dish, followed by fragrant garlic and juicy fresh tomatoes. Ensure that the flavors meld together perfectly by stirring occasionally. Trust your palate to adjust the dish with the ideal amount of salt and sugar, as per your taste preferences. If you worry about the tomatoes burning, don’t. You can easily add water to the dish as needed. This meal is sure to impress everyone at the table. You have all the tools to make this a culinary masterpiece!

STEP 3 –

By now, after patiently allowing the ingredients to simmer away for an hour and a half, the tomatoes will have softened, disintegrated, and infused with the perfect combination of spices. The result is a sauce that has reduced to a fraction of its original volume, yet intensified in flavor. So go ahead and confidently uncover the pot, knowing that your patience has paid off and a delicious, concentrated sauce awaits you.

I hope that you found this information to be helpful and that you enjoy making some of the best and easiest matbucha recipe!

If you try this recipe and love it, I would love if you could come back and give it 5 stars! 

Best Original Matbucha Recipe

Are you ready to embark on a culinary adventure that will transport your taste buds straight to the vibrant streets of Morocco? Look no further, because today we're diving into the world of matbucha – a delicious and tangy tomato-based dish that is as easy to make as it is irresistible. Bursting with flavor and packed with wholesome ingredients, this matbucha recipe is here to add a burst of color and excitement to your meals. So grab your apron, chop up those veggies, and let's get cooking!
Prep Time 10 minutes
Cook Time 1 hour 30 minutes
Total Time 1 hour 40 minutes
Course Side Dish
Cuisine middle eastern

Equipment

  • large pot 
  • wooden spoon
  • Knife
  • cutting board
  • Spoon
  • Garlic press optional
  • Gloves optional

Ingredients
  

  • 10 Smallmedium tomatoes 1 kilo. 2.2 pounds
  • 4 Spicy peppers optional and adjustable
  • 1 tbsp Salt
  • 0.5 tbsp Sugar
  • 0.25 cup Oil

Instructions
 

  • Mise en place: cut your tomatoes into half-inch chunks., carefully cut your peppers (using protective gloves as needed) and chop your garlic.
  • Begin by adding the oil and peppers to your dish, followed by the garlic. When you can smell the garlic add the tomatoes. Bring to a boil and add the salt and sugar.
  • simmer away for an hour and a half, the tomatoes will have softened, disintegrated, and infused with the perfect combination of spices. And enjoy your beautiful dish!
Keyword Challah, easy, easy dinner, healthified, shabbat

Join Our FARMHOUSE DOWNSTREAM Community

From scratch recipes, self-sufficient living, and handmade projects straight to your inbox

By completing this form you're signing up to receive our emails and can unsubscribe at any time

Spice Up Your Meals with This Simple Matbucha Read More »

Better Than Amylu Creamy Sage Chicken Meatballs

Enjoy this homemade better than amylu creamy chicken sage meatballs – all made from scratch. Delicious, handmade chicken meatballs in white sauce, sage, and dried thyme, served with any side dish you wish, perfect with rice creating a creamy, saucy bliss.

Looking for a delicious and unique twist on traditional meatballs? Look no further than this delectable Creamy Sage Chicken Meatballs recipe.

These tender and flavorful chicken meatballs are infused with fragrant sage, creating a savory and aromatic dish that is sure to impress your family and friends.

Paired with a creamy sauce, these meatballs are the perfect comfort food for any occasion. Whether you’re hosting a dinner party or simply want to elevate your weeknight meals, this Creamy Sage Chicken Meatballs recipe will not disappoint.

Get ready to indulge in a dish that combines classic flavors with a modern twist!

Welcome! I'm Einav

Greetings! I'm delighted that you discovered my little piece of online paradise. Join me as we relish in the comforts of our home centered lifestyle, living naturally, from-scratch cooking, and establishing a home that's a true reflection of who we are. Let's celebrate the everyday beauty of life together!

Why you will love this recipe:

Straightforward – This recipe is easy! Mix meatballs, shape into balls, saute until browned, add cream and seasoning, thicken, and serve.

Super comforting- with winter knocking on our doors we crave hot, nursing meals. this is perfect for those cold cozy nights.

Affordable – This recipe adds up to 3.28$ per serving. click here to read more

It’s perfect for last-minute dinner- totaling at 25 minutes from start to finish this dinner is awesome for those busy evening

What are amylu chicken meatballs?

Hey there, curious foodie! Are you wondering about Amylu chicken meatballs? Let me tell you, they are pre-made, pre-cooked chicken meatballs from Costco that are ready to heat up and eat! While they are high in protein, they do contain a good amount of sodium (7x more than our recipe).

But who needs those when you can try our homemade meatballs that are healthier, cheaper, and tastier? Our recipe only takes 25 minutes tops to make and has only 130 calories per serving of four meatballs. Plus, they’re a steal at only $9.34 for 60 meatballs. Trust me, our recipe is the way to go!

Food For thought:


Our bodies require protein for optimal health, but consuming too much can have negative consequences. The recommended daily intake of protein is 56 grams for men and 46 for women.


Excess protein can increase the risk of kidney stones and potentially heart disease and colon cancer if it comes from high-fat sources. We should spread out our protein intake throughout the day and be aware of added protein in foods.


Amylu meatballs contain 34 grams of protein, while the daily recommendation for women is 46 grams. It is also worth questioning why some foods contain more added protein than others, such as Amylu meatballs compared to our – Farmhouse downstream recipe.

Make your own homemade breadcrumbs

If you happen to have some leftover bread and are in need of dry breadcrumbs, here’s a simple process. Tear your bread into small pieces and place them in a low oven to completely dry out. Once dry, pulse the bread in a food processor or a blender until it forms breadcrumbs. 


Store them in the fridge for up to two months or in the freezer for six months for later use.

Ingredients list:

  • Ground Chicken
  • Egg
  • Breadcrumbs – click here to learn to make your own
  • Seasonings -Salt, Pepper, Thyme
  • Heavy cream – can be substituted for half and half but no more than 12% fat content. 
  • Butter – or Olive Oil
  • Sage – Fresh works best but dried can be a substitute 
  • Cornstrach

TOOLS YOU WILL NEED:

Large measuring bowl

Small bowl

Measuring spoons

Pan

Wooden spatula 

Attention all Cooks!

Did you know that you can freeze your cooked meatballs and have them taste just as amazing as they did when they were freshly baked?

Gone are the days of worrying about not having enough time to make homecooked meals for your friends and family.

With this trick, you’ll always be prepared to whip up an easy dinner in no time.

Not only will this save you time, but it’ll also save you stress.

Your future self will thank you for having the perfect solution to any busy evening!

How to Freeze Cooked Meatballs?


Freezing cooked meatballs is a great way to have delicious and easy meals in the future. It saves a lot of time and effort, so let’s get started!

First, double your recipe while you are making meatballs as it won’t take much extra time. Once your meatballs are fully cooked and cooled, it’s time to freeze them.

After preparing the meatballs according to your recipe, allow them to cool completely. Then, arrange them in a single layer on a baking sheet and freeze until solid. Once frozen, transfer the cooked meatballs to freezer bags or containers. Don’t forget to label them with the type of meatball and the date.


how do you reheat chicken meatballs?


To reheat the frozen meatballs, you can either thaw them overnight in the refrigerator or reheat them directly from the freezer. On the stovetop, reheat them in sauce or in a warm oven. Just remember to avoid overheating as you don’t want the exterior of the meatball to overcook before the interior warms up.

How to make the best creamy sage  CHICKEN MEATBALLS 

STEP 1

In a large bowl combine all the ingredients for the chicken meatballs: ground chicken, breadcrumbs, egg, seasonings and Mix well with your hands until completely combined.

STEP 2 –

Roll into 1″ balls and cook until browned in a buttered hot pan  on high heat

STEP 3:

once browned on all sides, add the cream and seasoning, bring to a boil and lower the heat to medium for 10 minutes.

STEP 3:

make a cornstarch slurry: 1 tbsp cornstarch with 3 tbsp water mix well and add to your sauce. Now keep an eye on your sauce as it will thicken up fast and you don’t want it to scorch. cook it for an additional 5 minutes until thick and creamy.

Serve hot with a side of rice, potatoes, pasta or what ever you prefer and enjoy this easy, simple comforting meal in no time.

I hope that you found this information to be helpful and that you enjoy making some of the best soft molasses cookies you’ve eaten!


If you try this recipe and love it, I would love if you could come back and give it 5 stars! 

Creamy Sage Chicken Meatballs recipe

Looking for a delicious and unique twist on traditional meatballs? Look no further than this delectable Creamy Sage Chicken Meatballs recipe. These tender and flavorful chicken meatballs are infused with fragrant sage, creating a savory and aromatic dish that is sure to impress your family and friends. Paired with a creamy sauce, these meatballs are the perfect comfort food for any occasion. Whether you're hosting a dinner party or simply want to elevate your weeknight meals, this Creamy Sage Chicken Meatballs recipe will not disappoint. Get ready to indulge in a dish that combines classic flavors with a modern twist!
Prep Time 10 minutes
Cook Time 15 minutes
Total Time 25 minutes
Course Main Course
Servings 2 People (35 small meatballs)

Equipment

  • 1 Large Mixing Bowl
  • 1 Small bowl
  • 1 PanCast Iron Skillet
  • 1 Wooden Spatula 

Ingredients
  

  • 0.7 pound Ground Chicken (300 grams)
  • 1 Egg
  • 5 tbsp Breadcrumbs (40 grams)
  • 0.5 tsp Salt extra to taste
  • 0.5 tsp Pepper extra to taste
  • 1 tsp Thyme
  • 7 oz Heavy cream (200ml) - can be substituted for half and half but no more than 12% fat content
  • 1 tbsp Butter- or Olive Oil
  • 5-6 sprigs of Sage Fresh works best but a few tsp dried can be a substitute
  • 1 Tbsp Cornstrach can use potato strach, rice strach or any thickining strach you have
  • 2 tbsp water

Instructions
 

  • Mix well the meatball components: ground chicken, egg, breadcrumbs and seaseonings.
  • add butter to the pan and heat until sizzling. form the ground chicken mixture into 1 inch balls and brown on a the pan
  • when brown and the cream, sage, extra salt, pepper and thyme to taste (don't go overboard as it is well seasoned already)
  • cook for 10 minutes
  • mix well cornstarch thickening slurry: 1 tbsp cornstarch with 2 tbsp water. add to the cream and mix until incorporated
  • The cream will thicken quickley so keep a close eye, cook for 5 minutes until thick
  • serve hot and enjoy!
Keyword chicken, easy dinner, fast dinner, healthified

Join Our FARMHOUSE DOWNSTREAM Community

From scratch recipes, self-sufficient living, and handmade projects straight to your inbox

By completing this form you're signing up to receive our emails and can unsubscribe at any time

Better Than Amylu Creamy Sage Chicken Meatballs Read More »

Warm, Gooey, and Convenient: Learn How to Make the Best Soft Drop Molasses Cookies That Can Be Frozen!

Ah, holiday molasses cookies are truly the best. I can hardly count the soft molasses cookies I’ve made and eaten this past month. they are SO good!

The best part is you can make a big batch and freeze it! these cookies bake beautifully from frozen. 


The aroma of the spiced sweet cookies in the oven and the joy of sharing these holiday cookies with others will always hold a special place in my heart.

Welcome! I'm Einav

Greetings! I'm delighted that you discovered my little piece of online paradise. Join me as we relish in the comforts of our home centered lifestyle, living naturally, from-scratch cooking, and establishing a home that's a true reflection of who we are. Let's celebrate the everyday beauty of life together!

Why you will love this recipe:


Straightforward – This recipe is so so easy!. Add all the ingredients to a mixer or a bowl with a whisk, divide into balls, freeze, and bake whenever you want within 3-6 months.


Super Tasty – Is there anything better than soft, sweet, freshly made molasses cookies?


Perfect for Hosting – This recipe makes the best hosting cookie recipe as it is easy to make a big batch, freezes beautifully, and bakes in 15 minutes straight out of the freezer!


It’s perfect for last-minute guests around the holidays, and perfectly accompanies any weekend feast, its mouthwatering smell is always a crowd-pleaser and devoured in minutes. Yum!

what is molasses?

It’s a popular sweetener with different types that can vary in flavor and strength.

Molasses is made from sugar cane during the sugar-making process.

The juice is extracted and boiled to make sugar crystals, leaving behind a thick, brown syrup that we know as molasses.

This process is repeated several times to create different types of molasses.

Interestingly, molasses contains some vitamins and minerals unlike refined sugar, which makes it a healthier alternative.


Blackstrap molasses

Blackstrap molasses has the highest concentration of vitamins and minerals due to its high intensity.

Now that you know a bit about molasses, you can choose the right type for your recipe.

What Are Substitutes for Molasses?

Suppose you are low on molasses and can’t run to the store. These easy substitutes will work in a pinch.

For savory dishes, replace one cup of molasses with the same amount of honey, or maple syrup.

For baked goods, substitute one cup of molasses with one cup of date syrup. 

Date syrup is super versatile and will go great with these cookies.

Ingredients list:

  • flour – All Purpose Flour is perfect for this recipe but any will do
  • Butter – soft
  • Blackstrap Molassesclick here to read more
  • Egg
  • Vanilla – high quality
  • Sugar – any type of sugar you like
  • Spices: cinnamon, cloves, nutmeg, all spice, black pepper
  • Baking soda

TOOLS YOU WILL NEED:

measuring cups

measuring spoons

Mixing Bowl

Food safe zipper bags – to freeze
baking sheet

baking paper

Ice cream scoop (optional)

Attention all bakers!

Did you know that you can freeze your homemade cookies and have them taste just as amazing as they did when they were freshly baked?

Gone are the days of worrying about not having enough time to make cookies for your friends and family.

With this trick, you’ll always be prepared to whip up a batch of cookies in no time.

Not only will this save you time, but it’ll also save you stress.

Think of how proud you’ll feel when you can offer your guests a freshly made cookie without having to rush to the kitchen.

So, let’s all ditch the worry and start stocking up on tasty treats in the freezer.

Your future self will thank you for having the perfect solution to any cookie emergency!

which molasses should i use?

Choosing the right molasses can be confusing, but no worries, I’ve got you covered with some tips.

To achieve the best flavor, I suggest you go for an unsulphured or dark molasses like “robust” molasses.

While blackstrap molasses may be too intense for some recipes, it can work for others. I love three brands – Grandma’s, Brer Rabbit, and Wholesome – but it’s totally up to you!

If you want a darker color, try using Wholesome’s organic molasses. Just take a look at how dark my spiced molasses cookies turned out!

If you prefer a lighter color, Grandma’s brand may be a better fit.

Don’t hesitate to reach out if you have any more questions. Enjoy baking!

HOW TO MAKE THE BEST soft drop molasses cookies

STEP 1

combine all the ingredients except the flour in a big bowl: soft butter, molasses, sugar, spices, baking soda, vanilla.

STEP 2 

incorporate the flour into the mixture and ensure it is fully combined. 

Use an ice cream scoop to form uniformly sized cookie balls and place them on a baking sheet.

The number of cookies you get will depend on the size of your ice cream scoop, but you should expect around 20 to 30 cookies in total.

STEP 3 – Freeze or Bake

if you wish to freeze your cookies scoop the cookies onto the baking sheet closely together and freeze on the baking sheet for around 30 minutes.

if you wish to bake the cookies right away bake them at 170c or 340F for 10-15 minutes.

take the cookies out when they are slightly firm to the touch 

Storage:

Store in an air-tight container. Eat within 2-3 days for best results. Or freeze unbaked for up to 3 months.

Freezing:

My favorite way to freeze cookies is before they are baked, you just can’t beat the smell of freshly baked cookies.

To freeze cookies, start by flash-freezing them (after step 2).

arrange cookie dough balls in a single layer on a baking sheet.

Pop the baking sheet in the freezer for 30 minutes or until the cookies are frozen solid.

Place frozen balls in a freezer-safe bag or container. To bake from frozen—just increase the recipe’s cooking time by 3-4 minutes (15-19 minutes).

next time you have a craving, you’ll have an emergency stash of deliciousness waiting for you! Whether it’s Chocolate French Macarons, Butter Cookies, or any other type of cookie, freezing them will give them an extra hint of freshness and crunch.

I hope that you found this information to be helpful and that you enjoy making some of the best soft molasses cookies you’ve eaten!


If you try this recipe and love it, I would love if you could come back and give it 5 stars! 

The BEST soft molasses cookies (Freezable & Easy)

Ah, holiday molasses cookies are truly the best. I can hardly count the soft molasses cookies I've made and eaten this past month. they are SO good! The best part is you can make a big batch and freeze it! these cookies bake beautifully from frozen. The aroma of the spiced sweet cookies in the oven and the joy of sharing these holiday cookies with others will always hold a special place in my heart.
Prep Time 10 minutes
Servings 6

Equipment

  • Measuring cups
  • Measuring Spoons
  • Mixing Bowl
  • Food safe zipper bags - to freeze
  • Baking Sheet
  • Baking Paper
  • Ice cream scoop (optional) 

Ingredients
  

  • 1.5 cup flour 188 grams
  • 115 grams soft butter 12 cup
  • 3 tbsp Blackstrap Molasses
  • 1 Egg
  • 1 tsp Vanilla perferably high quality
  • 0.75 cup Sugar any type of sugar you like
  • 2 tsp ground cinnamon
  • 0.5 tsp ground cloves
  • 0.5 tsp ground nutmeg
  • 0.5 tsp all spice optionl
  • a pinch ground black pepper
  • 1 tsp Baking soda

Instructions
 

  • combine all the ingredients except the flour in a big bowl: soft butter, molasses, sugar, spices, baking soda, vanilla.
  • incorporate the flour into the mixture and ensure it is fully combined.
  • Use an ice cream scoop to form uniformly sized cookie balls and place them on a baking sheet.
  • The number of cookies you get will depend on the size of your ice cream scoop, but you should expect around 20 to 30 cookies in total.
  • if you wish to freeze your cookies scoop the cookies onto the baking sheet closely together and freeze on the baking sheet for around 30 minutes.
  • if you wish to bake the cookies right away bake them at 170c or 340F for 10-15 minutes.
  • take the cookies out when they are slightly firm to the touch and let them cool and firm up before serving

Join Our FARMHOUSE DOWNSTREAM Community

From scratch recipes, self-sufficient living, and handmade projects straight to your inbox

By completing this form you're signing up to receive our emails and can unsubscribe at any time

Warm, Gooey, and Convenient: Learn How to Make the Best Soft Drop Molasses Cookies That Can Be Frozen! Read More »

Everything You Need to Know To Make This SENSATIONAL FLUFFIEST Challah Bread Recipe – Unbeatable and SO EASY!

Ah, the memories flood back as I think about this Challah Bread recipe. It truly is the best you can find.


I can hardly count the number of times I’ve made this bread in my lifetime.


At one point, I even had a small business in the pandemic where I spent my Thursday nights baking more than fifty mini challahs in my small kitchen.


The aroma of the bread baking in the oven, the softness of the dough under my hands, and the joy of sharing this cherished tradition with others will always hold a special place in my heart.


I find myself transported back generations every time I make this bread, reliving sweet moments of the past.

Welcome! I'm Einav

Greetings! I'm delighted that you discovered my little piece of online paradise. Join me as we relish in the comforts of our home centered lifestyle. I'm enthusiastic about living naturally, from scratch cooking, and establishing a home that's a true reflection of who we are, as Individuals and as a family. Let's celebrate the everyday beauty of life as we share our experiences together!

Why you will love this recipe:


Simple: This recipe couldn’t be easier. Add all the ingredients, hand knead or straight to the stand mixer,  Allow it to rise, then shape the dough, rise again and bake. 


Super delicious: Is there anything better than super soft, fluffy, sweet freshly made challah bread?


Perfect for weekend breakfast, lunch, and dinner: This recipe makes the best sweet and soft bread to accompany any weekend feast, its beautiful shape is always a crowd-pleaser and devoured in minutes.  it’s special for sandwiches or to eat with soup. Yum!

what is challah bread?

Challah bread is an important part of Jewish culture and tradition. People love it because of its nostalgic and beautiful shape and yummy taste.


It is often eaten on Shabbat, a day of rest. It is also eaten on holidays and during special times when people come together.


There are many customs related to making challah bread. Each type of challah is special in its own way. Challah bread is also meaningful because it represents important ideas.


People have many questions about it, so we will explore its history and importance in this article and most importantly my fool-proof vegan challah recipe.

Challah Shapes that Represent Meaningful Symbolism

Challah is more than just a delicious bread, it’s a representation of tradition and continuity. When we explore the different shapes that challah can take, we discover a rich tapestry of symbolic meaning that has been woven into Jewish history.

CIRCLE SHAPED CHALLAH

As we celebrate Rosh Hashanah, the circular or “donut” shaped challah represents not only the changing seasons but also the cyclical passing of time. Each year, this bread reminds us of the past and encourages us to strive for upward progress in the future.


KEY SHAPED CHALLAH

The key-shaped challah, usually eaten on the Friday after Passover, is another symbol of hope for a good livelihood.

This custom is based on the belief that all sustenance comes from God, and eating a challah in the shape of a key is an act of faith and gratitude for the abundance we have been given.


Let us always remember the meaningful symbolism behind every shape of challah we bake or eat, as it connects us to our past and inspires hope for the future.

why is challah vegan?


Vegan Challah bread recipes and has a long history.


the first recorded mention of Challah as the sabbath bread was made in 1488 and over time people changed the recipe to make it simpler.


Some people had limited resources and replaced eggs and milk with just water, yeast, salt, and flour.


Even though other recipes with ingredients like milk, honey, and eggs are available, many people still prefer this simple, vegan recipe.

Ingredients list:

  • flour – All Purpose Flour is perfect for this recipe
  • active dry yeast
  • salt – fine salt
  • sugar – any type of sugar you like
  • water

TOOLS YOU WILL NEED:

measuring cups

measuring spoons

plastic wrap\tea towel\bees wax

pastry brush

baking sheet

baking paper

Make it your own! – Versatility


Harking back to times immemorial, people have known the importance of versatile recipes – those that offer flexibility and allow the cook to experiment with different ingredients. And this recipe for challah bread seems to fit that bill perfectly!

It is so versatile that you can add anything you want to it with confidence. You can customize it to your liking, incorporating your favorite ingredients; believe us, your options are limitless!


CINNAMON RAISIN CHALLAH BREAD RECIPE


With a few tablespoons of cinnamon and raisins, you can conjure up a mouth-watering cinnamon-raisin challah recipe,


CHOCOLATE CHIP CHALLAH RECIPE


add 1\4 cup chocolate chips to your dough when kneading to make some beautiful and sweet chocolate chip challah recipe. 


HOW TO MAKE MINI CHALLAH


if you’re in the mood to make mini-challahs, this recipe can easily accommodate your needs. It’s like having a blank canvas upon which you can paint your culinary picture as vividly as you desire!

This recipe yields two large loaves of challah bread, but with confidence, you can turn it into 8-12 mini challahs by merely lowering the oven temperature to 150C or 300F. let your imaginations run wild and experiment with your favorite ingredients without any hesitation!


this truly is a 5-star challah bread recipe

Sweetening your challah – Enhancing the flavor 


If you’re looking to take your challah game to the next level, consider sweetening the dough to enhance the flavor. This simple suggestion can make a huge difference in the taste and texture of your bread.


Adding the few tablespoons of sugar that are in the recipe really make a big impact, but if you really want to indulge in a sweeter taste, don’t be afraid to add in extra sugar – around 4-6 tablespoons should do the trick. Don’t worry about going overboard, either – trust your taste buds and you’ll be rewarded with a delicious outcome.


Whether you’re a seasoned baker or just starting out, trying out different variations of this classic recipe is a fun way to experiment with different flavors and textures. So why not give it a try? You might just discover your new favorite way to prepare challah.

HOW TO MAKE THE BEST challach without a mixer

STEP 1

combine all the ingredients in a big bowl: flour, oil, sugar, salt and water

STEP 2 – MIXING


Start mixing the ingredients by hand. 


Once you feel that the wet ingredients are somewhat incorporated, you can dump them on your working bench. 


Believe me, it will make the process so much easier and enjoyable.

STEP 3 – KNEADING


Now let’s knead the dough! This is where the fun begins!


Try to work the dough until it feels smooth and well-mixed.


Don’t worry if it takes some time, just enjoy the process and remember that practice makes perfect!

STEP 4 – NO MIXER KNEADING

If you want to make your dough smoother and softer without using a mixer, you’ll need to knead it for a little longer. 

Kneading causes the gluten strands to get stronger and longer, but don’t worry, I can guide you through the process.

Remember, too much gluten can make the bread tough and chewy, so we’ll want to relax the dough for a bit alternating between kneading regularly and doing this method. 

This will reduce the elasticity of the dough and make it easier to roll out. If you need further assistance, check out my step-by-step kneading tutorial below!

Let’s get started by opening up the dough and gently stretching its gluten.

Then fold it into thirds and roll it back into a tight ball. 

Repeat this process 4-5 times, alternating between kneading and stretching. 

This technique will make your kneading process faster and more effective.

STEP 5 – FIRST RISE


Now return the dough to its original bowl,


oil the dough Cover it with a tea towel and put it in a warm place for about an hour or until doubled in size.


it will look like the right picture below.


if you wish you can stretch this step longer and slowly rise it in the fridge overnight. 

STEP 6 – DIVIDE INTO BALLS


Divide the dough into balls. this recipe makes two big challahs.


you can divide it into 6 equal pieces to make two 3-strand challahs


or into 8 equal pieces to make two 4-strand challahs. you are the boss of your challah! 


and let them rest for 10 minutes

STEP 7  – BRAIDING AND SECOND RAISE


braid your challah however you choose to.


here I’m demonstrating you can achieve a four-strand challah.


let the dough rise for 25-30 minutes after you finish braiding.


Preheat oven to 180C or 350F turbo fan mode.

STEP 8 – BRUSHING AND BAKING 


after letting your challah rest for 25-30 minutes.


(this step will make sure you have a fluffy challah) 


you can check it fully risin’ if you can make a dent in the dough without it springing back.


you can brush it with an egg wash, a pinch of salt, and molasses or date syrup.


to make it fully vegan you can omit the egg and add a few tablespoons of water to make the mixture thinner. 


if desired you can sprinkle sesame seeds on top.

STEP 9 – BAKE


bake your challah bread on a baking sheet in the oven for 20-25 minutes until the bottoms are golden brown. and enjoy!


To Make your life easier I’ve calculated two baker’s schedules: one overnight, and one for the same day.


Baker’s Schedule Friday Night Challah:


9 AM: mix ingredients and knead dough as shown here to reach the perfect gluten development 

9:30 AM: Start First Rise

10:30 AM: Divide and shape 6\8 equal balls. Let rest 10 minutes

10:40 AM: Braid your dough into two big Challah Bread. 

10:50 AM: Let rest 25-30 minutes until puffy and beautiful

11:15 AM: Bake at 180C or 350F for 20-25 minutes


Baker’s Schedule overnight Challah:


10 PM: mix ingredients and knead dough as shown here to reach the perfect gluten development 

10:30 PM: Start First rise in the fridge

8 AM the next day: Take the dough out of the fridge and divide it into 6 or 8 equal balls. let rest and come to room temperate for around 30-40 minutes.

8:30 AM: Braid your dough into two big Challah breads. if the dough is still cold let it sit for a while longer 

8:40 AM: Let rest 25-30 minutes until puffy and beautiful

9:10 AM: Bake at 180C or 350F for 20-25 minutes and allow to cool before serving.

Storage:

Store in an air-tight container. Use within 2-3 days for best results. Or freeze for up to 4 months.


Freezing:

the best way to freeze Challah bread is after the bread is fully baked and cooled.


you can easily wrap your loaves in plastic wrap and store them in the freeze for up to 4 months.


but this is one of those recipes that will be prefect when dry for french toast on Sunday morning.

My Personal Challah Tradition


I probably made hundreds of Challahs in my life, some didn’t rise enough, and some rose too much. but they were always so impressive and oh-so delicious. challah is just the perfect bread. light and airy. 


In my family when blessing on the challah in Friday dinner we take one loaf and “pull” the challah in half, say the blessing, and dip smaller pieces of bread in a small bowl of salt and pass them around until everyone has a piece. 


It’s a beautiful tradition and we look forward to eating challah every week. 


we usually make two challahs a weekend because we don’t keep Shabbat and can cook through the weekend but more religious families will make more so they will have bread to accompany each of the meals from Friday dinner up to Sunday morning

FAQ:

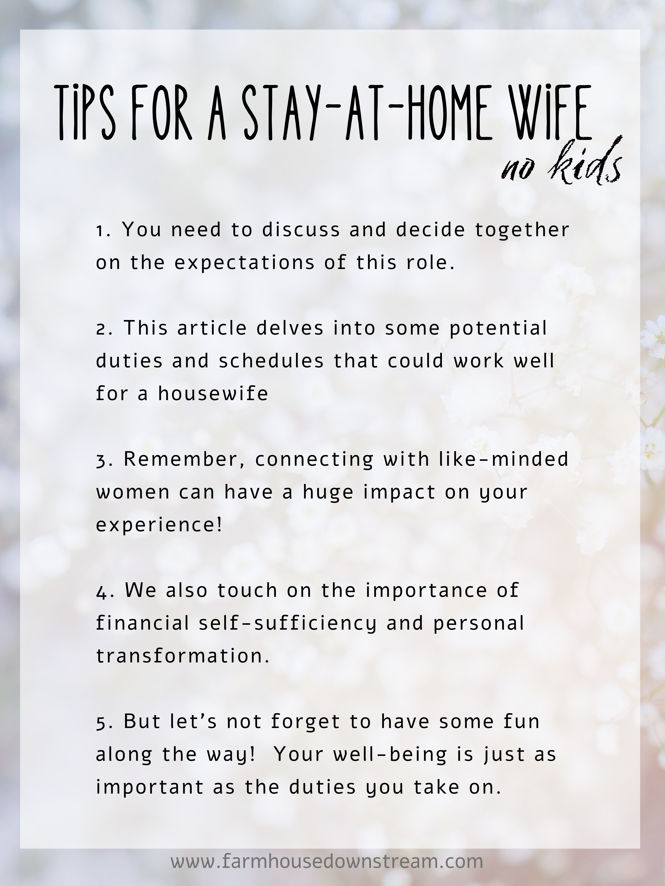
frequently asked questions and answers: 


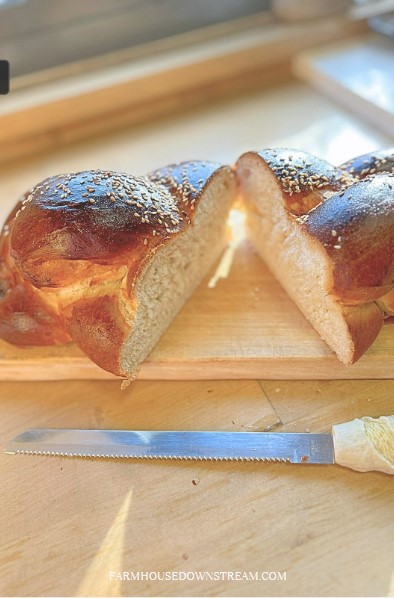
why is my challah not fluffy?


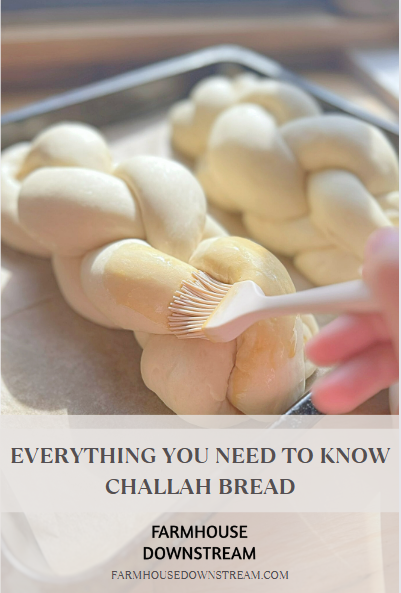
if you’d like your challah to turn out perfectly fluffy, there are three very important steps that you’ll want to keep in mind.


And let me tell you, these are practically the secrets to success when it comes to baking challah.


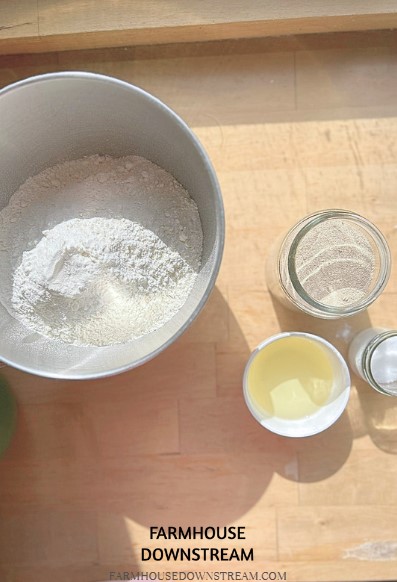
1. To start with, you’ll want to ensure that your yeast is fresh and still full of life. So, test it with some sugar to see whether it’s still alive before you begin.

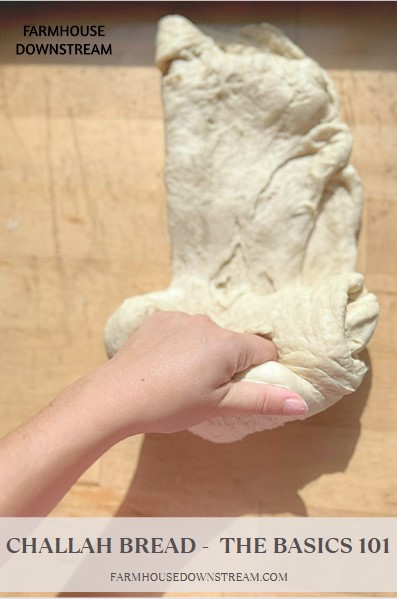
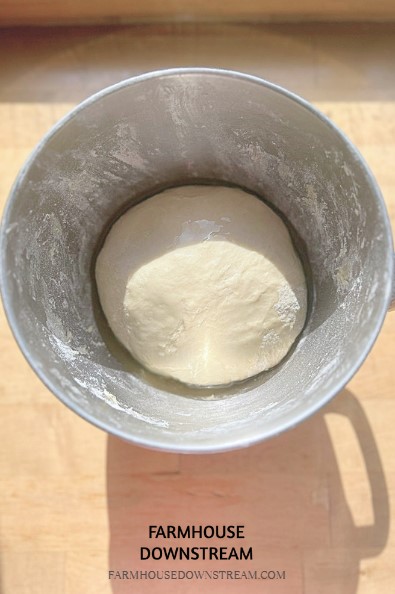
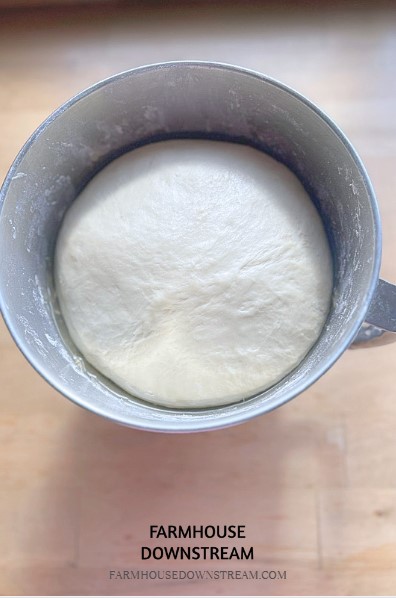
2. Next up is the proofing stage, which is something that needs to be done slowly and patiently.


For best results, simply allow your dough to proof until it has doubled in size. If your room is on the cooler side, this might take a bit longer than expected.


3. Finally, bake the challah in turbo mode in your oven! You won’t be disappointed with the fantastic outcome that you achieve.


what is the best flour for challah bread?


when it comes to the best flour to use for your challah, there are a multitude of opinions out there.

professionals swear by using bread flour but I believe all-purpose will work just as well.


However, the great news is that you can kind of take your pick here.


Whatever flour you happen to have on hand will work great, so there’s no need to fret about hunting down an elusive specialty flour.


can you overproof your challah?


it is possible to accidentally overproof your dough, but have no fear.


Even if that happens, you’ll still end up with some tasty challah to enjoy.


And if you need to get things done in a hurry, I suggest giving the fridge a try for proofing your dough.


why is my challah not rising?


One final thing to address is what to do if your challah isn’t rising as it should be.


If it’s not rising at all, your yeast may be past its prime and you should get a new package.


On the other hand, if it’s only partially risen, give it some more time and be patient.


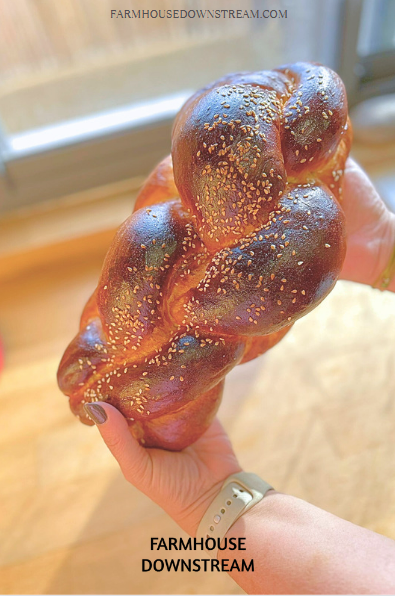
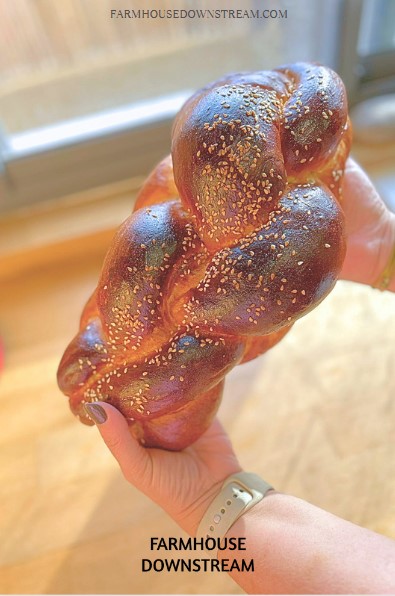
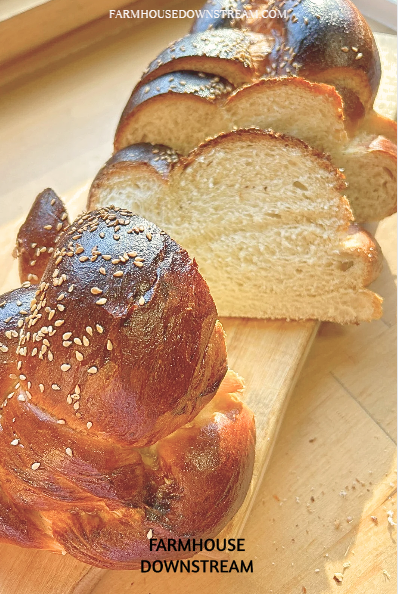
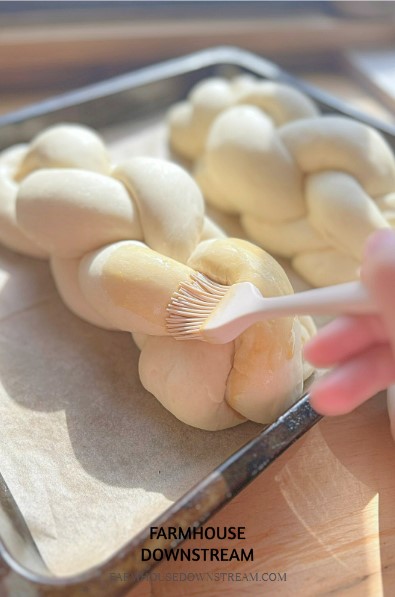
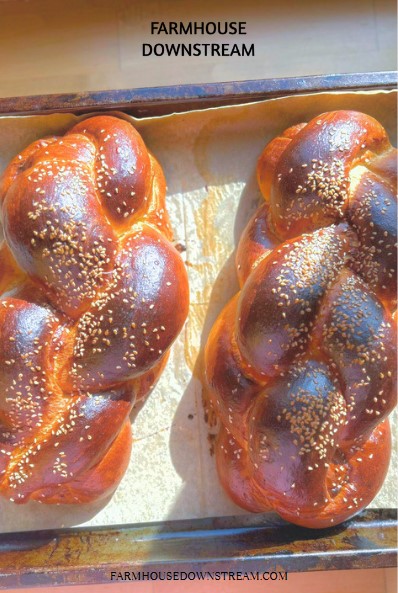
how do you make your challah golden brown?


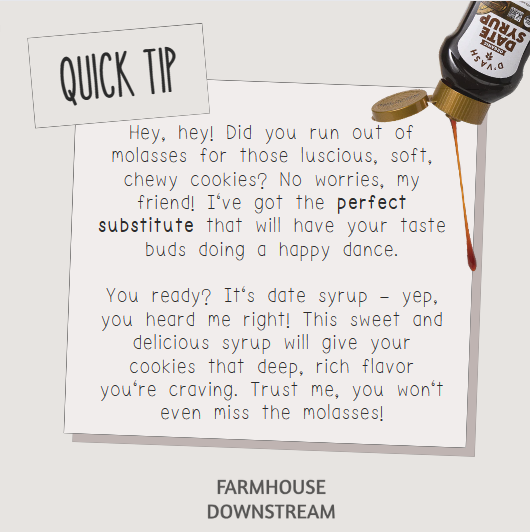
the trick it to brush it with an egg wash mixed with a pinch of salt (it breaks down the egg) and a tablespoon of molasses or date syrup making your challah bread have a sweet and brown crust.


if you want to make it vegan all the way you can mix a few tablespoons of date syrup or molasses with a bit of salt and warm\boiling water for easier mixing. mix it well!


I hope that you found this information to be helpful and that you enjoy making some absolutely delicious challah.


If you try this recipe and love it, I would love if you could come back and give it 5 stars! 


The BEST Challah recipe for fluffiest, softest and perfectly chew

This recipe couldn’t be easier. Add all the ingredients, hand knead or straight to the stand mixer,  Allow it to rise, then shape the dough, rise again and bake.  Is there anything better than super soft, fluffy, sweet freshly made challah bread?
Prep Time 30 minutes
Cook Time 30 minutes
Resting Time 1 hour 30 minutes
Total Time 2 hours 30 minutes
Servings 2 Big Challah breads

Equipment

  • 1 Mixing Bowl
  • 1 measuring cupsKitchen Scale
  • 1 plastic wraptea towelbees wax
  • 1 Measuring Spoons
  • 1 Pastry Brush
  • 1 Baking Sheet
  • 1 Baking Paper
  • 1 Oven

Ingredients
  

  • 8 cups Flour (1 kg)
  • 2 tbsp Active Dry Yeast
  • 6 tbsp Sugar (add 4-6 tbsp more if you want it to be a sweet challah)
  • 0.5 cup Oil
  • 1 tbsp salt (10 grams)
  • 2- 2.5 cups Water (start by 2 cups and add gradually if needed)

Instructions
 

STEP 1

  • combine all the ingredients: flour, oil, sugar, salt and water

STEP 2 - MIXING

  • You can either mix the dough in a stand mixer or by hand, if you want some tips to knead the dough by hand check out my instruction up above.

STEP 3 - FIRST RISE

  • return the dough to its original bowl, oil the dough and wrap in plastic wrap or a tea towel. let the dough rest and rise for an hour or until doubled in size in a warm place.

STEP 4 - DIVIDE INTO BALLS

  • dived the dough into equal sized balls. this recipe makes two big challahs. you can divide it into 6 equal pieces to make two 3-strand challahs
  • or into 8 equal pieces to make two 4-strand challahs. you are the boss of your challah! and let them rest for 10 minutes

STEP 5 - BRAIDING AND SECOND RISE

  • braid your challah however you choose to. let the dough rise for 25-30 minutes after you finish braiding. Preheat oven to 180C or 350F turbo fan mode.

STEP 6- BRUSHING AND BAKING

  • after letting your challah rest for 25-30 minutes. (this step will make sure you have a fluffy challah) you can check it fully risin' if you can make a dent in the dough without it springing back. you can brush it with an egg wash, a pinch of salt, and molasses or date syrup. to make it fully vegan you can omit the egg and add a few tablespoons of water to make the mixture thinner. if desired you can sprinkle sesame seeds on top.

STEP 7 - bake

  • bake your challah bread on a baking sheet in the oven for 20-25 minutes until the bottoms are golden brown. and enjoy!
Keyword Challah
Join Our FARMHOUSE DOWNSTREAM Community!

From scratch recipes, natural living tips, and handmade projects straight to your inbox

*By completing this form you’re signing up to receive our emails and can unsubscribe at any time

Everything You Need to Know To Make This SENSATIONAL FLUFFIEST Challah Bread Recipe – Unbeatable and SO EASY! Read More »

Luxurious Effortless Apple Cinnamon Cocktail – Fool-proof Celebration using VODKA (new!)

Hey there! Looking for a tasty cocktail to serve at your upcoming fall-themed dinner party? 


This easy apple cinnamon cocktail is the perfect choice for the occasion! 


Your adult guests are sure to love its delicious flavors and cozy fall vibes. Give it a try and let us know how it turns out! 

Welcome! I'm Einav

Greetings! I'm delighted that you discovered my little piece of online paradise. Join me as we relish in the comforts of our home centered lifestyle. I'm enthusiastic about living naturally, from scratch cooking, and establishing a home that's a true reflection of who we are, as Individuals and as a family. Let's celebrate the everyday beauty of life as we share our experiences together!

This recipe was part of a larger fall-inspired menu that I have created. 


In case you’re interested in exploring and trying out other recipes from this menu, 


I encourage you to check the link below where you can find the complete menu and its accompanying recipes.

how to serve a cinnamon apple cocktail

Cocktail presentation can elevate the entire drinking experience and make any occasion even more delightful.

Therefore, I would highly recommend serving this particular cocktail in a tall, slightly narrow glass that emphasizes its sleek and elegant nature.

Specifically, I suggest trying out flute-shaped glasses that bring a touch of vintage charm to your drinking experience.

In my opinion, these “fairytale-inspired cocktails” are the epitome of sophistication and glamour, and will be a surefire hit among your guests.

The visual aspect of the drink is almost as important as the taste, so presenting it in a beautiful glass that complements its unique flavors is a great way to impress your friends and family.

Of course, if you don’t happen to have flute-shaped glasses at home, a wine glass would do just fine in a pinch.

Ultimately, the most important thing is to enjoy your drink in good company, whether it’s served in an elegant glass or not.

ingredient list for cinnamon apple cocktail:


These are the ingredients you’ll need to make a apple cinnamon vodka fall cocktail recipe at home:


· Vodka: Traditionally i make this cocktail with vodka but you can use any alcohol you want


· Lemon: You’ll need the juice for the drink. check out my tip here to make this cocktail so much easier


· Apple Juice: Organic unfiltered raw apple juice really works best here 


· Ice: we serve this cocktail over ice.


· Ginger ale: Not to be confused with ginger beer!


· Aromatic Cocktail Bitters: we use Peychaud’s Aromatic Cocktail Bitters. they have a very different taste than other aromatic bitters; it’s a stronger anise flavor, reminiscent of absinthe, rather than a spiced herbal blend. (can be omitted)


· Cinnamon Stick: makes this cocktail so much better!

tools for cinnamon apple cocktail:

  • 1 cocktail shaker (optional)
  • 1 spoon
  • cocktail glass
  • 1 60ml measurement 

what are armotic cocktail bitters

Bitters add complex flavors to cocktails. Originally medicinal tonics, they now add unique blends of botanicals and herbs to drinks. With classic cocktails making a comeback, bitters have resurged too. Typically 20-50% ABV, a few drops are all that’s needed to enhance a drink’s taste and aroma. Celebrate these little flavor enhancers and expand your cocktail repertoire!

method


STEP 1

add to the the cocktail shaker the 30ml vodka, 15ml lemon juice\monin sweet&sour, 60ml apple juice and 3 dashes of bitters.


STEP 2

add a handful of ice cubes to the shaker, close and shaker for 20 seconds or so until the cocktail shaker is frosty on the out side


STEP 3

add cinnamon with 3-5 ice cubes to the serving glass and pour the cocktail from the shaker


STEP 4

top the glass with ginger ale to your liking, not more than 1\2 the cocktail mixture.

Apple Cinnamon Vodka Fall Cocktail

Hey there! Looking for a tasty cocktail to serve at your upcoming fall-themed dinner party? This easy apple cinnamon cocktail is the perfect choice for the occasion! Your adult guests are sure to love its delicious flavors and cozy fall vibes. Give it a try and let us know how it turns out! 
Total Time 10 minutes
Course Drinks
Servings 1 cocktail

Equipment

  • 1 60ml measuring glass can use any measuring tool you have
  • 1 cocktail shaker optional, can be stirred in a big glass
  • 1 serving glass

Ingredients
  

  • 30 ml · Vodka: Traditionally i make this cocktail with vodka but you can use any alcohol you want
  • 15 ml · Lemon: You'll need the juice for the drink. check out my tip here to make this cocktail so much easier
  • 60 ml · Apple Juice: Organic unfiltered raw apple juice really works best here
  • 12 ice cubes · Ice: we serve this cocktail over ice.
  • 30 ml · Ginger ale: Not to be confused with ginger beer!
  • 3-4 dashes · Aromatic Cocktail Bitters optional
  • 1 per glass · Cinnamon Stick: makes this cocktail so much better!

Instructions
 

STEP 1

  • add to the the cocktail shaker the 30ml vodka, 15ml lemon juicemonin sweet&sour, 60ml apple juice and 3 dashes of bitters.

STEP 2

  • add a handful of ice cubes to the shaker, close and shaker for 20 seconds or so until the cocktail shaker is frosty on the out side

STEP 3

  • add cinnamon with 3-5 ice cubes to the serving glass and pour the cocktail from the shaker

STEP 4

  • top the glass with ginger ale to your liking, not more than 12 the cocktail mixture.
Keyword cocktail
Join Our FARMHOUSE DOWNSTREAM Community!

From scratch recipes, natural living tips, and handmade projects straight to your inbox

*By completing this form you’re signing up to receive our emails and can unsubscribe at any time

Luxurious Effortless Apple Cinnamon Cocktail – Fool-proof Celebration using VODKA (new!) Read More »

Stay-at-home wife NO KIDS – Practical Benefits to being a HOMEMAKER

Are you interested in becoming a stay-at-home wife?

Check out our article for guidance on duties, schedules, and the fulfilling experience it can be for both you and your spouse.


We highlight key advice for stay-at-home wives that you will find helpful in taking the first step towards this lifestyle and exhibit EMPOWERING tips for the modern stay-at-home wife.


We also touch on the importance of connecting with like-minded women and learning about financial self-sufficiency and personal growth and more! Don’t miss out on this amazing opportunity!

Welcome! I'm Einav

Greetings! I'm delighted that you discovered my little piece of online paradise. Join me as we relish in the comforts of our home centered lifestyle. I'm enthusiastic about living naturally, from scratch cooking, and establishing a home that's a true reflection of who we are, as Individuals and as a family. Let's celebrate the everyday beauty of life as we share our experiences together!

I chose to be a stay-at-home wife


As women, we have the freedom to make our own choices, including decisions about career and family.


For me, that choice was to become a stay-at-home wife. Although it may not have been a popular decision in my community, I followed my heart and pursued a path that made sense for me and my partner.


Being a housewife is not a limitation, it is a privilege I couldn’t afford myself for years. Now, I have the honor of creating a beautiful and loving home for my small family, providing them with a comfortable and welcoming space to come back to every day.


As a proud stay-at-home wife, you get to flex your nurturing muscles every day. I am proud to be a stay-at-home wife and grateful for the opportunity to pour my heart and soul into my family’s well-being every day.

I am here to lend a helping hand.

Together, we can overcome any challenge and achieve great success.


So don’t hesitate to reach out and let’s make your dreams a reality. Remember, with dedication and determination, the sky’s the limit.


The purpose of this article is to provide practical advice on how to become and hot to excel at being a stay-at-home wife.  

she once dreamed of being a stay-at-home wife


Being a housewife is truly an incredible experience that I am blessed to have the opportunity to enjoy! In fact, it is not just a role or a responsibility, but rather a privilege that I cherish every single day.


After years of juggling a multitude of different obligations and commitments, it feels incredibly liberating to be able to dedicate my time, love and energy towards creating a warm and nurturing home for those closest to me.


Being a housewife allows me to take on a myriad of responsibilities and tasks, all of which are ultimately geared towards fostering a peaceful and happy environment for my loved ones to thrive in.


From cooking and cleaning, to managing the household and caring for my family, each and every moment spent on these tasks is a reminder of just how lucky I am to be a housewife.


Ultimately, I believe that it is through these acts of service and devotion that we are able to express our love and appreciation for those who matter most to us.

How can I become a stay-at-home housewife?


When considering becoming a stay-at-home wife, it’s important to understand that the responsibilities you take on will be unique to your situation.


No two families are exactly alike, and as such, the division of labor will vary.


You may choose to work part-time from home or not at all, for example, and different household tasks may be divided differently depending on your strengths and preferences.


Both you and your partner must agree on the responsibilities you will take on as a stay-at-home wife, and view your days not as a vacation, but as an opportunity to contribute to your family unit.


In this article, we will explore potential duties and schedules for a stay-at-home wife and provide advice for making the most of your time at home.


Remember, being a stay-at-home wife is an important role, and a decision that should be taken seriously – but with careful consideration, it can be a fulfilling and rewarding experience for everyone involved.


what are the responsibilities of a stay-at-home wife?


the responsibilities of a stay-at-home wife are the responsibilities you and your husband decided on, you might have decided you’ll work part-time from home, or maybe you won’t work at all.


maybe you have the responsibility to maintain the garden or whatever else “chores” you divided by the two of you.


a husband and a wife who decide together the wife will be a stay-at-home wife is a decision that needs to be taken together, as a family this will change how you both treat each other. 


it is important to view your days not as a vacation but as everyday life, the fact that you are at home doesn’t mean you should slack and not take your day seriously.


this article will go through a stay-at-home-wife duties and schedule you might want to consider before making that big step. 

Embrace your role with enthusiasm!

Being a stay-at-home wife can be both challenging and fulfilling. One of the most important things to remember is to embrace the unique challenges and joys that come with this lifestyle.

With a positive attitude, you will be able to create a more fulfilling experience for yourself and your household.

As a stay-at-home wife, time management skills are crucial.

I have found that setting alarms for tea breaks or assigning specific nap times for my pet dogs has been a funny but helpful way to be more time productive. Additionally, I make a conscious effort to write down my daily tasks, goals and routines.

Each night, I write a to-do list of things I didn’t get around to doing today but want to do tomorrow. In the morning, I write down my schedule for the day.

I encourage you to create schedules that allow you to balance household chores, personal hobbies, and self-care effectively. Remember, perfection is overrated, and occasional mistakes can turn into hilarious stories later on, so don’t stress it too much.

pros and cons of staying at home as a stay-at-home wife without children.


In the context of evaluating the advantages and disadvantages of being a stay-at-home wife, it is important to consider both the positive and negative aspects of this lifestyle.


While there are some challenges associated with this role, such as:


CONS:

  • Being a stay-at-home wife can be stressful.
  • Sometimes dealing with criticism can be intense.
  • Less social interactions
  • Managing household chores

Being a stay-at-home wife certainly poses its set of challenges. However, it’s important to remember that amidst the cons, there are plenty of inspiring pros to focus on.


PROS:

  • In this role, you have the freedom to design your own schedule according to your preferences.
  • Trying out new recipes
  • You can take up new hobbies, try new recipes and have plenty of time for self-care.
  • Moreover, this lifestyle is associated with low anxiety levels, allowing you to stay calm and focused on your goals


It’s understandable that criticism can be hard to handle at times, but remember that you have the power to overcome this obstacle with your determination and positivity. 


Embrace the positives, keep yourself motivated and make the most of every opportunity that comes your way.

Keeping sanity intact through social interaction


Feeling isolated can be an incredibly difficult experience, and it’s not uncommon to struggle with it.


However, there are many ways to effectively deal with the situation. As someone who is a stay-at-home wife, I can attest to the significant impact of connecting with other women in my community.


Finding like-minded individuals may require some effort, but local groups or online communities can provide a great resource.


In my personal experience, spending quality time with my loving grandmother has been invaluable for both of us. We get to share laughter, joy, and life experiences.


However, while such interactions are great, it’s equally essential to reach out and socialize beyond our immediate families.


It may feel daunting, but seeking out companions in similar life phases can provide a much-needed support system.


You don’t have to face daily struggles alone, and finding someone who listens and understands can make a world of positive difference in your life.


So go ahead and take the leap; don’t be afraid to make new acquaintances!

Balancing finances


As we embark on our journey toward taking charge of our finances, let us be inspired and motivated to make a true change.


Let’s find innovative ways to budget that work for us and allow us to achieve the lives we want.


Even though budgeting may not be our assigned role or come naturally to some, we can all recognize its importance.


One such way to achieve financial freedom is through the use of coupons. Whether it’s just a measly 5% or 10%, every penny saved counts and can significantly add up over time.


Additionally, budgeting for food and groceries can be a fun, fulfilling hobby for us to master. read more about creating a modern urban homestead even in an apartment!


But, as always, we need to start by communicating with our significant others about our finances. Open dialogue is key to achieving financial self-sufficiency.


We must support each other on this journey and strive for success with creativity and determination. With these tools in hand, there’s no limit to what we can accomplish together.


For more tips on getting Started with self Sufficient living and why IT IS possible. You can click here.

Continuously growing personally and professionally


Personal growth and development are important aspects that add value to life. It is important to engage in activities that cultivate a sense of personal improvement and satisfaction.


In today’s world, there are countless options to explore, such as pursuing interests (and even job opportunities) like cooking or making homemade goods.


Taking online courses is also a great way to acquire new skills and stay updated on the latest developments.


Starting a blog is another perfect way to express yourself creatively while also gaining valuable experience in writing and content creation.

Being a stay-at-home wife can be challenging, but it is also an opportunity to invest in personal growth and development.


It is easy to get wrapped up in the daily routine of household chores and family life. However, taking the time to pursue individual interests and hobbies can be incredibly satisfying.


Learning new skills and being creative can help foster a sense of fulfillment and purpose in life.

It is essential not to underestimate the value of personal transformation and to embrace the unexpected opportunities that come our way.


By doing so, we can continue to grow as individuals and lead fulfilling lives. Because like homes, individuals should also change and grow.


For conclusion


this article is packed with helpful advice for all the amazing stay-at-home wives out there. We know this is a big decision, and taking it seriously is key.


It’s important for you and your hubby to discuss and decide together, and with careful consideration, this lifestyle can be incredibly fulfilling and rewarding for everyone involved.


We delve into some potential duties and schedules that could work well for a housewife, while also embracing the unique joys and challenges that come with this lifestyle.


Plus, connecting with like-minded women can have a huge impact on your experience! We also touch on the importance of financial self-sufficiency and personal transformation.


But let’s not forget to have some fun along the way! Embrace your role with enthusiasm and humor, and don’t forget to laugh often. Your well-being is just as important as the duties you take on.

IDEAS FOR A STAY-AT-HOME WIFE SCHEDULE WITHOUT KIDS:

Some links we mentioned throughout the article:

More on Urban Homesteading you can click here


For HOW TO become self-sufficient click here


More about Modern Homemaking and Homemaking Schedules you can click here


Join Our FARMHOUSE DOWNSTREAM Community

From scratch recipes, self-sufficient living, and handmade projects straight to your inbox

By completing this form you're signing up to receive our emails and can unsubscribe at any time

Stay-at-home wife NO KIDS – Practical Benefits to being a HOMEMAKER Read More »

Revolutionary Urban Homesteading ideas – What is Urban Homesteading (NEW!)

Congrats on embracing a self-sufficient lifestyle!


You can homestead anywhere, even in the city. With determination and learning, you can master urban homesteading.


It’ll have challenges, but the rewards are immense – think self-reliance, localization, and sustainability.

Location won’t stop you. We’re here to support you.

Welcome! I'm Einav

Greetings! I'm delighted that you discovered my little piece of online paradise. Join me as we relish in the comforts of our home centered lifestyle. I'm enthusiastic about living naturally, from scratch cooking, and establishing a home that's a true reflection of who we are, as Individuals and as a family. Let's celebrate the everyday beauty of life as we share our experiences together!

Hey there! Welcome to our guide on urban homesteading!


We’re excited to teach you the basics and take you through the history of homesteading from ancient times to today.


We’ll also explore the different forms of modern-day homesteading and its core concepts.


Afterward, we’ll dive into urban homesteading, discussing the various types, who can do it, and how to do it on a budget.


whether you’re in a rental or an apartment We hope this guide helps you on your journey to becoming an urban homesteader.


Let’s get started!

Homesteading throughout the Ages

Let’s take a journey through time to understand the inspiring concept of modern day urban homesteading.


Homesteading has always been about embracing a lifestyle of self-sufficiency, where one can create a home and farm on their own land. 


The Britannica dictionary defines a homestead as a house and the farmland it is on. Even in the past, the western part of the U.S was settled because of individuals who were passionate about homesteading. 


Today, urban homesteading offers a new version of self-sufficiency where individuals can adapt these old concepts to modern city living.


The idea of creating something from nothing, and building a sustainable life for oneself is truly inspiring.


Urban homesteading is a celebration of our roots, and an exciting way to create a bright future. 

The Homestead Act of 1862

The Homestead Act of 1862 was a game-changer for the development of our great nation. 


Thanks to this revolutionary legislation signed into law by the visionary Abraham Lincoln, anyone could own a piece of the American Dream.


The act offered 160 acres of land, free of discrimination, to anyone ready to work on it and better it for the greater good. It did not matter what your color, religion, or race was. 


This was the perfect opportunity to take control of your destiny and pave the way for a brighter future. 


It is incredible to think that 270 million acres were distributed under the Homestead Act, and that was all because of the courage and leadership of President Lincoln. 


Let this remind us all that anything is possible when we believe in ourselves and each other.

Homesteading Nowadays

Are you ready to embark on a journey of self-sufficiency, sustainability, and empowerment?


Homesteading may look different in each household, but the benefits are universal.


Whether you’re motivated by reducing your carbon footprint, saving money, or cultivating a deeper connection with nature, urban homesteading can transform your life and your community. 


By becoming a homesteader, maybe even growing your food, raising backyard chickens, or collecting rainwater, you can become a steward of the planet and a master of your destiny. 


The homesteading journey is an individual one, but with the help of this article, you can discover the joys and rewards that await you on the path of modern urban homesteading. 


So, don’t wait any longer. Take the first step towards your homesteading adventure and join the growing movement of modern urban homesteaders today!

The Categorization of Modern-Day Homesteading

Homesteading offers diverse possibilities with traditional, modern, and post-modern categories to choose from in an urban, suburban, or countryside setting. 


It’s an excellent opportunity to connect with nature, preserve resources, and explore a sustainable lifestyle. 


Break free and create a unique, fulfilling life in the city or a small town. Start your homesteading adventure today and discover incredible rewards.

Pre-modern homesteading, a captivating and noble way of living, 


was a popular lifestyle choice for individuals in America’s yesteryears who sought to seize control of their destiny.


Originating from The Homestead Act of 1862, pre-modern homesteading entails living independently,


embracing self-sufficiency, and acknowledging the fundamental rights of all individuals.


This noteworthy way of life perfectly aligns with the values outlined in the Declaration of Independence,


encapsulating the very essence that made America great.


For those who hold these values in high esteem, pre-modern homesteading is a path worth taking.


By living in such a manner, you embody the American dream,


paying homage to the founding principles that made America a beacon of hope for countless individuals seeking independence, freedom, and prosperity.


Embark on a journey towards pre-modern homesteading to help build a brighter future united by these shared principles of excellence.

PRE-MODERN HOMESTEADING AT A GLANCE:

  • First off, the scale of everything was pretty large – we’re talking loads of acreage, plenty of livestock, and heaps of vegetables and preserves.


  • homesteading this way offers an opportunity to turn into a full-on business, with the potential to sell livestock as meat, for instance. 


So, if you’re into farming or just curious about the ways people lived in the past, this could be a topic worth exploring. 

what is modern homesteading?

With hard work and hope, you can build your modern homestead and create your desired life. 


The current Homesteading Act serves as an inspiration for those who seek to live off the land and maintain self-sufficiency. 


The rural version of modern homesteading may be a rugged version to accomplish due to budget and resources. 


The modern approach to homesteading is a testament to the resiliency and determination of those who choose this path. 


For the contemporary homesteader, every day is a challenge, but with steadfast dedication, determination, and unwavering faith, anything is possible. 


The modern homesteader lives a lifestyle of constant hard work and knows that every effort you put in will lead to a rewarding and fulfilling life. 


Dare to dream big and believe in yourself – the possibilities are endless.

MODERN HOMESTEADING AT A GLANCE:

  • No-dig Garden beds – a type of gardining technique where there is less weeds coming out of the garden beds
  • Seasonal gardening is gardening only when the season allows it
  • Preservation of seasonal garden for less-abundant times
  • Careful yearly planning of homestead goals and budgeting

what is post-modern homesteading?

While continuously working towards achieving self-sufficiency in each of their journey of homesteading. 


It’s important to understand that we can’t do everything all at once, and that’s okay. 


It’s all about choosing our battles wisely and taking things one step at a time. 


In the world of post-modern homesteading, there are endless possibilities and no set rules. 


We can create our unique vision for homesteading and make it a reality. 


Let us embrace our individuality and strive towards a sustainable lifestyle that brings us joy and fulfillment.


With determination and passion, anything is possible on our homesteading journey.

Post-modern homesteading equipment, for example:

The core concepts of homesteading:

No matter which type of homestead you choose to have, remember it can change and shift throughout the years and phases of life. 


These three powerful concepts of localization, self-reliance, and substantiality are the basic concepts of creating a bright homesteading life. 


Localization:

Ensuring that our basic needs are met close to home. These basic needs can alter to each their own. 


They may include the skill of homemaking, homeschooling, medical practices at home, farming, vegetable gardening, meat growing, and preserving the harvests—Dairy cow milking (or sheep or goat), cheese making, and so on.


Self-reliance

Re-learning the value of doing things ourselves, not relying on others, and learning traditional skills our ancestors practiced.


Sustainability:

Giving back to our communities and the environment. One way we achieve this is by increasing vegetable production by 25% while refraining from using insecticides and allowing extra produce to serve as a food source for local insects and bugs. 

The ancient law of the temple inspires another way in Jerusalem, an obligation to donate 10% of the homestead’s produce to charity, called “the poor man’s tithe.” 


These practices align with the mission to contribute to a healthier and more sustainable future for all.

What is Urban Homesteading?

Urban homesteading, also known as backyard farming, small-scale land homesteading, suburban homesteading, homesteading in an apartment, micro homesteading, city farming, and maybe homesteading in a retirement home.


urban homesteading is first things first- living a more sustainable life and lifestyle that practices the life of less consumption, less dependency on the supply chain and more handmade and homemade and sometimes make do with what is available now and understanding that not everything is reachable.

Urban homesteading vs. Sub-Urban homesteading vs. Rural Homesteading

Homesteading is a fantastic way to lead a self-sufficient lifestyle and can be achieved anywhere you call home! 


It doesn’t matter if you reside in a bustling city, in the suburbs, or on a sprawling rural property; 


there are advantages and disadvantages to each location, but rest assured, each set can be worked with and can even be transformed into the homestead of your dreams.


Living in a rural area affords you the most space, particularly if you want to raise animals or grow a larger crop. 


Nonetheless, don’t let urban or suburban living damper your homesteading aspirations; perhaps urban or suburban living is better suited for your family or lifestyle.


Suburban homesteading offers convenient access to resources, stores, and potential money-making opportunities that could come with starting your micro-business. 


Meanwhile, urban homesteading is a great way to begin with tiny land available; it takes some creativity and commitment.


So, regardless of your location, there are techniques and approaches to make your homesteading dreams a reality. 


Don’t be hesitant to try out new strategies, build your homestead exactly where you are, and create your ideal self-sustaining lifestyle! 


To read more about the pros and cons of each homesteading type, you can check the morning chores blog post.

Types of urban homesteading:

Urban homesteading- a way of life that emphasizes self-sufficiency, sustainability, and creativity to make the most of our world’s resources. 


By adopting this approach, individuals can move towards a more rewarding and fulfilling lifestyle, gaining skills that can be shared with others. 


With the ultimate goal of reducing overall consumption and increasing self-sufficiency, urban homesteaders can become a part of a growing movement that acknowledges the value of homemade and handmade items and sustainable living practices. 


This way of life allows for a greater awareness of our needs while contributing to a more sustainable future for ourselves and our communities. 


By taking this step, urban homesteaders can develop a sense of accomplishment and pride in their ability to provide for themselves, making a more meaningful impact on the world around them. 


Urban homesteading, just like “traditional” homesteading, is all about being as self-reliant as possible.

Who Can Have an Urban Homestead?

Anyone who puts their heart into it can have an urban homestead. 


If you are looking to create the urban homestead of your dreams, always keep in mind that you possess the ability to make it unique and tailored to your style. 


Remember, building an urban homestead from scratch or working with an existing property can be an exciting journey for you. 


You can be inspired and guided by the three categories of modern-day homesteading: pre-modern homesteading, modern homesteading, and post-modern homesteading.


As you commence this journey. By nurturing dedication and passion, you can develop a remarkable homesteading oasis no matter your stage of life. 


Building an urban homestead requires hard work and a touch of creativity, but with the right mindset, you can make your dreams come true. 


So, what are you waiting for? Begin exploring and let your urban homestead creations flourish in ways you never thought possible.

Urban Homesteading in a Rental

If you dream of homesteading but are renting, don’t let that discourage you. 


Even though it’s true that the Homestead Act of 1862 may no longer apply, there are still ways to achieve a self-sufficient and sustainable style of living. 


The most critical factor here is following the core values of localization, self-reliance, and sustainability, which can be practiced regardless of where you reside. 


By incorporating these principles into your daily lifestyle, you can create a fulfilling homesteading life that will brighten your days. 


It’s also essential to remember that your homestead can evolve and adapt to different stages of life. 


It’s not something that happens overnight but rather a journey worth embarking on. 


Don’t give up on your dreams, and always believe in yourself. With perseverance and determination, you can achieve anything.

Urban Homesteading in an apartment

Congratulations on taking the first step towards homesteading in an apartment! 


While it may present some challenges, you can overcome them with determination and creativity. 


Remember to stay true to your values of localization, self-reliance, and sustainability, and embrace the opportunity to adapt and learn. 


Don’t let the small space discourage you – it’s incredible what can be achieved with ingenuity. 


Even though your homesteading space is limited, don’t let that stop you from achieving your goals. 


This is an incredible opportunity to flex your homesteading muscles and tap into your ingenuity.


Consider planting fruit trees in your apartment to elevate your homesteading experience. 


Keep an open mind and explore resources; some links can be found in the “post-modern homestead” section of this article.


so scroll up to find some inspiration. With your infectious positivity and willingness to do your best, you can do anything you put your mind to, even in the smallest spaces.

budget Homestead – substantial homestead

Let’s get one thing straight: we all have a budget. Homesteading is a passion, and it’s essential to recognize that budget plays a role in everyone’s experience, no matter how experienced or how seasoned a homesteader we may be.


Homesteading is a lifestyle, not a mere goal, and it’s essential to always keep in mind its core concepts: the power of localization, self-reliance, and sustainability. 


Whether or not we fit into the categories of traditional homesteader, modern homesteader, or post-modern homesteader, we can all strive to honor the lifestyle of homesteading.


and You can still rock the homesteader title even if you purchase your food at the grocery store, don’t have livestock or don’t have a compost pile. 


Yes, we understand the struggles surrounding homesteading but give yourself credit for the aspects you have achieved, such as creating an outstanding outdoor space or cultivating beautiful plants.


Homesteading is a way of life that requires effort, and it’s vital to celebrate your accomplishments along the way! 


Remember, a part of being a homesteader is understating there are times in life for everything, let nature and faith do its thing.

FAQ:

Is homesteading worth it?

Absolutely! With dedication and hard work, anyone can transform their urban space into a beautiful homestead. 


If you want to create your dream urban homestead, never forget that your creativity and personal style are essential in making it truly distinctive. 


Building an urban homestead from the ground up or renovating an existing property can be a thrilling adventure for you! 


Every step of the way, remember that you can craft a beautiful and sustainable space that you’ll love for years to come. 


So, don’t be afraid to roll up your sleeves and take on the challenge – your urban homesteading journey awaits you!

How do I start urban homesteading?

When it comes to homesteading, To improve your homesteading skills, focus on these three concepts: localization, self-reliance, and sustainability. 


Meet your basic needs nearby, do things yourself, and give back to your community and environment. 


These three concepts are fundamental, and I encourage you to start incorporating them into your daily life. 


With dedication and hard work, you can become a successful homesteader. 

Gifts for aspiring homesteaders

Hey there, fantastic gift giver! 


If you’re stumped on what to give to your favorite aspiring homesteader, consider these tips: Think locally!


 It’ll make their day if you find something made right in your neck of the woods. 


And who doesn’t love a good sourdough? Maybe gift them a class, or even bake some bread together! 


And if you’re feeling extra generous, why not take them to volunteer at your local food bank? They’ll love spending time giving back to the community. 


After all, nothing feels better than being self-reliant and sustainable.

Join Our FARMHOUSE DOWNSTREAM Community

From scratch recipes, self-sufficient living, and handmade projects straight to your inbox

By completing this form you're signing up to receive our emails and can unsubscribe at any time

Revolutionary Urban Homesteading ideas – What is Urban Homesteading (NEW!) Read More »

Scroll to Top